
This is actually quite a simple idea although only older children and teenagers will probably manage this independently.
 I only say this as I feel it would be more difficult for most younger people, although my 6 year old enjoyed watching her older sister and myself put it together the other day. She is also enjoying playing with it and is interested to understand how it works and talk about the bones, so it makes for a great classroom resource to bring science alive!

You will need:
- Paper
- Paper straws (not plastic ones)
- Glue, PVA will do nicely
- Sticky Tape
- String or wool
- Stanley knife
Now for the STEP-BY-STEP of how to make your mechanical hand!
STEP ONE
Get your piece of paper and draw round a hand!
STEP TWO
Cut out your hand shape.
STEP THREE
STEP THREE
You will notice when you curl your own hand into a fist that you have three bends to each finger, they are your phalanges bones. The end of the last bend (your knuckles) you will notice is a little way further down your hand than where your fingers appear to end.
We will mark this point on the hand shape like this...
We will mark this point on the hand shape like this...
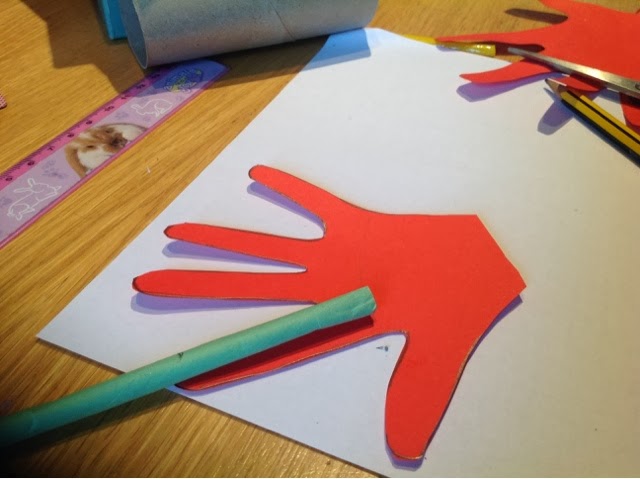
The line on the paper we used seems faint against the red, but if you look for it you can see it.
STEP FOUR
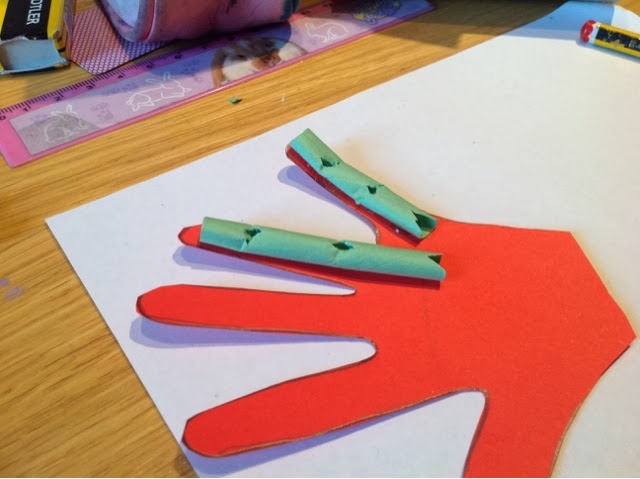
Take a straw and put one end at the line you've made on your hand to the tip of a finger and mark off on your straw, so you know how long you will have to cut your straw bone, like in the picture above. Do this for all five digits, 4 fingers and a thumb.
I colour coded the straws/bones so all the Phalanges bones were green and the metacarpals were blue, it doesn't need to be that way, it's optional.
STEP FIVE
I used a Stanley knife for this next bit...
There are three types of phalanges bones in your fingers the Distal phalanges, in the tiny bone at the tip of your finger; the middle phalanges, the next bones down from the distal; and the proximal phalanges, the one the ends at your knuckles.
Where each of distal and the middle phalanges meet we will carefully cut out a diamond shape like in the photo above.
We will do the same to make the joint for the middle phalanges to the proximal and then a triangle at the end, where it will meet at the metacarpal bone. The pictures will help you to see what I mean.
Do this for all four fingers but when you get to the thumb you only have two bones, the distal and the proximal so only one diamond in the middle and then a triangle cut out at the bottom.
STEP SIX
Now you are ready to add your metacarpal bones. These are the bones that run through your hand. you can feel then easily on the back of your hand.
Measure each straw, like in the picture below, from the bottom of your proximal phalanges to the wrist on your paper hand, marking each off so you know where to cut.

STEP SEVEN
Cut another triangle at the top of the metacarpal straw bones so they make a diamond when fixed down under the phalanges, look at the picture below this to see what I mean.
STEP EIGHT
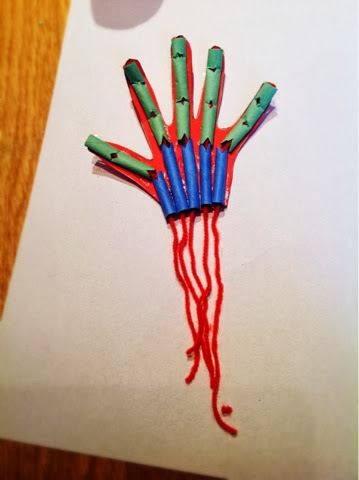
Carefully glue all the pieces down so the diamonds and triangles are all faced upwards. Wait for the glue to dry.

STEP NINE
Thread your string or wool up through a metacarpal and then up through the phalanges above it. Pull the wool over and round the back of the hand and then stick the wool to the back of the finger you are doing and stick it down with tape.
Do the same for each digit and it should look like this...

STEP TEN
You are finished. To work your mechanical hand pull the wool strands. Can you make a fist shape? The wool acts like the tendons in our own hands, as they tighten the hand moves just in the same ways as our own hands!
I know this is really picky but the two middle fingers share the same muscle in the hand and it operates both fingers so if you lay your hand out and tuck finger next to your index finger underneath you can bring up all your fingers except the one between the little finger and tucked up finger (or see it demonstrated on QI)
ReplyDeleteThey are joined but there are still 5 tendons one for each digit which, of course, allows you to move each finger individually into a fist John. Here is a diagram that will help you understand what I mean: http://healthfavo.com/wp-content/uploads/2013/08/muscles-of-the-hand.gif
DeleteOf course you are right to say that the two in the centre do share a muscle and you would trap one finger by trapping the other but that is different from making a fist and that is indeed a very interesting fact, I too love QI :)
Thanks for leaving a comment here! It's always nice to interact with my readers!
Cool project, and one that can be done by all ages, good stuff.
ReplyDeleteThank Techno Mole! :D
DeleteThankyou for this great idea.I did this with my two children and they really enjoyed it.We will be doing many more of your experiments/projects.
ReplyDeleteAh, that is so lovely to hear. I hope you enjoy the other experiments on here as much :)
DeleteVery inspiring and instructive...tx
ReplyDeletePleased to hear that it is being enjoyed! Thank you for leaving a comment, I do love to hear from my readers! :)
DeleteWe did it a few years ago, but we glued our hand to a Styrofoam plate. I love that yours is mobile. You can see ours here: http://de-tout-et-de-rien-caroline.blogspot.com/2012/03/tire-la-cordelette-et-la-main-bougera.html
ReplyDeleteI love that your blog is in French and English! Thank you for sharing this with me. I will have more of a look at some more of your posts when I get time later :)
DeleteHi there,
ReplyDeleteWhere did you get your straws from? Did you make them yourself? I tried this today with plastic straws and the hand worked well, only it won't curl into a fist (like you mentioned!). Thanks!
Hi, thanks for your question.
DeleteIt is important that the straws are paper, I managed to pick some up in a craft shop, however, I have found some here if that is more helpful to you: http://www.amazon.co.uk/Talking-Tables-Pink-n-Mix-Paper-Straws/dp/B0078DKC6O
It's lovely to hear that you've been trying my project. I hope you have more success with paper straws (I am sure you will) Hope to hear from you soon,
Lisa x
can it pick up light things? like a Hershey's chocolate kiss?
ReplyDeleteI am not sure but I will give it a try soon Kacie :)
DeleteLove your blog ... Thanks for sharing such great things with others ... Great idea...
ReplyDeleteThank you for your lovely comment, it's lovely to hear that they're being enjoyed x
DeleteThank you for your lovely comment, it's lovely to hear that they're being enjoyed x
Delete